Showing posts with label dress. Show all posts

Monday, 31 December 2012

New year’s lobster dress (or possibly crayfish…)

I’ve been making this dress for about a year. It’s one of my epic wips. It’s not as if I’ve had the pattern pieces cut and stuffed in a bag somewhere either. Nope, this thing was all put together and was on my dressform looking lovely just waiting for buttons and hemming. For a whole year.

I think I’ll have to keep it there because Mrs dressform is looking very sad without it!

First, I need to show you the fabric!

IMG_2690

Isn’t it amazing? It’s a weird combination of food, fishing and flowers. I got it from Ikea ages ago and immediately knew what I was going to do with it.

IMG_2689

I used a combination of Bestway D3664 (for the skirt)

IMG_3961

and Weldons 8342, view c, for the top.

IMG_3960

…and joined them in the middle to make a vintage-style button-through dress. The top pattern is size 16 so it needs manipulation to get it smaller. I had to move the darts and take out some fabric but I left the shoulders wide to give it a 50’s style cap sleeve.

IMG_3956

I drafted the bright red collar myself because the dress needed a little extra something. Aside from the lobsters, I particularly like that martini glass on the left front.

IMG_3959

The buttons are from Ribbonmoon, a wonderful online haberdashery shop. I urge you to check them out, they have loads of vintage-style buttons and other lovely things at very reasonable prices.

IMG_3958

I’m going to wear this to my friend’s New Year party tonight and I’m pretty excited - I’ve made lots of yummy vodka jellies to take too!

Happy New Year everybody!

Beccy

Thursday, 1 November 2012

I got me some new fabric…

Ok, so I don’t actually need more fabric – the space under my bed hides so many overflowing boxes it looks like my bed is levitating – but I saw it and it was only £5 for 3.5 metres. It’s not quite as bright as in the photo and it is lovely.

IMG_3489

It also looks a bit Horrockses, like this:

horrockyellow

…and this:

page-44-Harris

I’ve been a bit obsessed with Horrockses dresses ever since I was bought this V and A book ‘Horrockses Fashions, Off-the-peg Style in the 40’s and 50’s’

untitled

I heartily recommend it, just for the eye-candy value of the beautiful fabrics and normal women wearing beautiful dresses.

Because I’ll never own an original (and even if I do, let’s face it, I’m never going to wear it – too precious!) I’m going to make my own, sort of.

IMG_3487

To that end I hopped onto Ebay and bought a repro 1957 pattern, Vogue V8789 (£9 including postage from America). I don’t quite have enough fabric for that huge skirt, but since it’s only a gathered rectangle I’ll be able to make-do.

The only thing is that my fabric is diagonally printed so I’m going to have the devil of a time matching the print!

Beccy

Monday, 19 September 2011

Rescued with a dyebath…

I had this dress which I had worn (and washed) to death. It’s hard to tell in the photos but it was starting to look tired and a bit bleached around the edges.
IMG_0757IMG_0758
I also had this top which had gone a bit grey, and then I somehow managed to wash it with a red tee-shirt which left faint pinky blotches all over it.
IMG_0756IMG_0755
Cue Dylon Mexican red…
IMG_0766
Just make sure your rubber gloves don’t have holes in them…
IMG_0759
I realised at the last minute that I had loads of dye salt but no dye fix. A quick look on the interweb told me I could use washing soda (nope haven’t got any of that) or sodium carbonate, AKA soda ash (nope, haven’t got any of… wait a minute!) Soda ash is commonly used in glazes, and what do I have a workshop full of? That’s right, glaze ingredients. Woo! I found some and fixed my dye. It worked perfectly, and was probably cheaper than the Dylon stuff.
After the dye bath - it’s a bit hard to tell in this photo (why is red so hard to photograph?) but it’s very vibrant and no longer looks washed out.
IMG_0879
I didn’t bother reading the label on the top because it was either this or turning it into dishcloths but it turned out to be polycotton. Well, what do you expect from topshop?
IMG_0877IMG_0878
I don’t mind though because the colour is lovely. It’s a little bit salmon and a little bit hot pink. I’ll get more use out of it now though, it looks like new!
Beccy

Sunday, 3 April 2011

I forgot to show you my Open Studios dress!

Despite the weeks and months of hair-tearing stress, I decided to make myself a new dress for the event, last minute. “Only you…” said ma. But sometimes, you just need a new dress. It looks nice in the workshop and dammit, I want to look nice too!
I used two patterns:
IMG_0562
View A, but with the sleeves. Combined with…
IMG_0561
…this skirt. The top part is definitely 60’s – look at that hair! But the skirt is 50’s. It looks a lot bigger in the pretty drawing than it actually is, but then the pattern has a 26” waist (and I don’t) so I replaced the soft pleats with gathering. Also the top doesn’t have a 26” waist either, more like 35 so I had to be creative with the darts. I should really try buying patterns in my size!
IMG_0559
The fabric is some beautiful 50’s vintage I got from a random fabric sale at college. I had to use every scrap to make it (and sew some scraps together to make the button placket for the skirt!)
IMG_05602
It was also very dull and a bit 80’s-does-50’s looking until I added the red polka-dot ribbon to the neckline and hem.
IMG_0563
I know, good shoes. By the way, mum once told me that in the 50’s my gran had a 19” waist! How’s that for tiny? I haven’t asked her, but I have seen her wedding dress and if I had any nostalgic ideas about wearing it if I got married someday, I don’t now. Blimy, that lady was tiny.
Beccy

Monday, 23 August 2010

I finished the skirt-to-dress… and a tutorial!

I’ve surprised myself, I’ve only gone and finished a WIP!
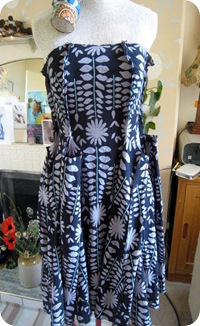
finished front
Here’s how I did it…
You will need one oversize skirt - for reference, I’m a UK size 10-12(ish) and the skirt I used was size 22 and ankle length. You will also need a dressform, sorry but unless you’ve got a really patient friend who’s good with pins, a dressform is essential. There are plenty of tutorials on the interweb on how to make a duct-tape dressform from your own body if you don’t have one. You will also need a zip and a button.
As I mentioned in my last post, I removed the decorative hem and the elasticated waistband. I reused the hem as a contrasting fabric to form the band round the top and the sash belt.
pin seams to waist
I then pinned the skirt to the form (just pins round the top at this stage) making sure the neckline was sitting in the right spot. You can try on a dress you like and measure from shoulder to neckline and then transfer this measurement to the form. You don’t want it too low!
bodice pinned close up
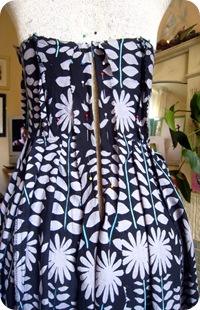
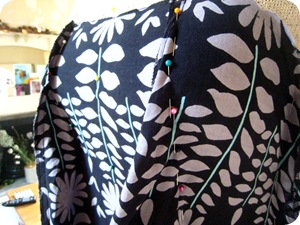
Now it’s time to get your pins out! With this much fabric you will need to make princess seams following the curve of the bust. It is much easier if you pull and pin the top of the skirt tight to the form, then find the centre front, back and sides and pin them down to the dressform. Then all you have to do is gather the excess fabric between them and pin like crazy! You will need two seams in the front and two in the back. You can make them straight and fitted like I did, or you could get creative! The bottom of these seams will become pleats in the skirt part of the dress so you’ll need to take this into account – one big pleat in the front and one in the centre back will not be attractive. Only pin to the waist and try to conceal any existing seams while you’re at it!
Mark your waistline at every new seam.
sew seams bodice
This part’s a bit scary! Sew your new seams, taking care to stop when you reach your waistline mark. Once you’ve done this it’s a good idea to try the dress for fit. It can be a bit tricky getting those princess seams right first time, but it’s better to get them right now rather than find out they’re wrong later!
trim seams bodice 1
Now slash the fabric at the waistline stopping 1cm short of your new seam.
trim seams bodice
Now remove the excess fabric from the bodice seams.
after trimming seams
Your dress should now look like this (on the inside!)   
flatten pleats
Now press your seams flat and pin the loose folds of fabric below the waist to form soft box pleats.
sew down pleats
Sew ‘em down!
pin back seam
Now pin the back ready for your zip and trim away the excess fabric. Sew up the back seam and press.
sew band
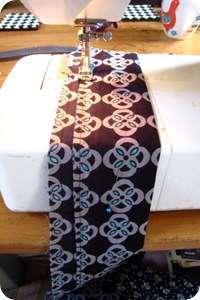
Now measure around the neckline and cut a length of your contrasting fabric, double the width plus 1cm you want your band to be, and slightly longer than your measurement. Fold over lengthwise leaving one side 1cm wider and sew. This extra 1cm will reduce some of the bulk in the seam later. Honest.
At this point I also cut facings for the neckline because this is a thin cotton - if your have a stiffer fabric you might not need any facings. I used the strip of fabric I cut from the back, pinned it to the neckline and cut a 2” band all round. I can do that because I have no boobs – If you are anything above an a-cup you’ll need some shaping. Pin your strip to the form and pleat under the arms until it lays flat. Sew those pleats.
sandwich better
Now to attach your band and facings. Pin the band right side up on the right side of the dress and make a sandwich with the facing on the top, wrong side up. Got it? Good, now sew ‘em all together. If you didn’t make a facing, don’t worry – pin the right side of the band to the wrong side of your dress and sew. Use the extra cm on the band to sew it to the dress, it should help cut down on bulk in the seams.
Flip the band to the front and iron the bajingers out of it. When you insert the zip, you will need to turn the ends of the band and facing to the back and sew them to the inside of the dress.
topstitch band
Topstitch the band and insert your zip. I sewed the zip to stop below the band, made a button loop from one of the old hanging loops and sewed a button to the band of the dress.
Measure for your straps and cut two from your contrasting fabric. Sorry no photos of this step but if you want 1” straps cut two lengths 2 1/2” wide, fold them face to face lengthwise, sew a 1/4” seam, use a knitting needle to invert them and press. Pin them to you dress, sew them down and you’re done bar the hemming!
finished frontfinished back
I used a long length of the contrasting hem as a sash belt. Because the cotton is so thin the print has bled through and it’s hard to tell which is the right side. This is great because it meant I only needed to hem the raw edge of the sash rather than fold it in half to sew it, and I could keep it wide.
The hem of your dress should be longer at the back than the front, and you could choose to trim it all the same length but I chose to hem it as it was. I’m not lazy or anything (OK, I am) but I like it slightly asymmetrical.
I hope my ramblings make sense!
Beccy

Wednesday, 18 August 2010

Skirt to dress AKA playing with the dressform…

I bought this size 22 skirt from a charity shop ages ago – I love larger clothing because the skirts tend to be long, voluminous and elasticated which means there can be quite a bit of lovely fabric to work with!
IMG_9389 IMG_9390
I cut off the waistband and the patterned hem and started pinning like mad on my dressform. Sorry about the lousy pictures but I did a lot of this at night and did a couple of variations.
IMG_9393
Princess seams (the gores fall in roughly the right place) with the old hem used as a sash belt, straps and band.
IMG_9397
Empire line with the hem becoming the bodice and straps.
IMG_9399
Gathered under the bust so I don’t get all squished!
IMG_9400
The hem loosely pleated and tacked to the bust. I hate this. It was an attempt to give myself boobs but it just looks silly!
I think I like the top one best because it could become my “50’s dress from stash” as listed in my projects in the pipeline. It also has more shape than the empire line. It would need to be shorter than it is at the moment, and I’ll need to cut a bit of fabric away, so I’ll have some left over for another project – matching headscarf? Heehee.
If you don’t already have a dressform I really urge you to get one. Mine is a second-hand Singer something-or-other I got really cheap on Ebay and it adjusts everywhere. It makes refashioning clothing a lot more fun and easy because you can try out quite a few ideas quickly without having to put on pin-filled clothing and look in the mirror. You can also see the back! Of course it doesn’t rule out trying on the clothes altogether when you’re making, but it can be helpful to pin your favourite idea to the form and leave it for a few days just to get used to it – you usually come up with a few improvements!
I’ll let you know how it turns out!
Beccy

Tuesday, 19 January 2010

My Coffee Date dress version…

IMG_81922
I bought this fabric, um, pair of curtains, from a charity shop on Saturday.
IMG_8185
They were double layer, white on one side and green on the other, and although they cost £6 (over my flinch point) they were big, and I though the right dress pattern might not look too much like curtains-made-dress.
I dragged out all my patterns but none were right, and I wanted to use one fabric as main and the other as accent. Enter the Coffee Date dress, a free printable pattern from the blessed Burdastyle :)
Here’s how it came out…
IMG_8189
I added sleeves because I’m not really built for that shift-dress thing. The sleeves are just a basic light puff, and I added a turn up hem in contrasting green. Obviously I haven’t done the final pressing, it needs hemming and I need to add a button at the top back but I had some light and took the chance for a photo!
The pattern wasn’t too hard but it doesn’t come with any instructions so you’d need to have made a dress before (or just grab the instructions from another frock) so you do things in the right order! I just winged it really, so the sewing (and ripping and re-sewing…) took from 12 lunchtime until 1 in the morning, with a break for tea. Yawn. I’ve also lost some weight and am now smaller than my dressform (don’t get too excited, she’s the larger sized Singer, I’m not a size ‘0’ or anything!) so that made it a bit harder.
I was hoping with the addition of the sleeves it would look more vintagey, and it looks much better on – imagine it with a vintage cardi, belt and some pointy shoes.
I have also cut the pieces for the Kasia skirt, with the dark green for the main body and the white for the pockets. I’ve made that before, so it should be quicker than the dress!
On the same charity shopping expedition, I also got this fabric, um, duvet cover:
IMG_8187
And this is the other side:
IMG_8188
It’s honestly nicer than the photo, it’s grey and almost black with this amazing shot of red. Can’t you imagine a 50’s-style dress using one of the borders as a hem? Graduated-like, and worn with a bright red wide patent belt and heels? Maybe a red bolero jacket? It could be awesomesauce, but I haven’t got a clue where I’d wear it!
Beccy