Showing posts with label Refashion. Show all posts

Thursday, 18 July 2013

York Dragon Boat race 2013 – a steampunkish pirate in action!

2013-07-14 11.49.14

There aren’t too many photos of me knocking about but here I am, looking a bit short, about to prove that you CAN row a boat wearing a bustle and corset.

P10000372013-07-14 11.52.492013-07-14 11.53.10P1000030

There were 17 of us rowing the boat, plus a few reserves so there were plenty of pirates on the day!

P1000067

Every team rows three races and then your best times are used to determine who races in the final. We didn’t make the final – our best time was 1.21 and the winners’ best time was 1.04 – but boy did we have fun!

P1000016P1000071

It’s hard work, splashy and tiring but the whole thing raises thousands for charity and has the feel of a festival.

The College Crew are in lane 2!

I don’t know who filmed this or where it came from but it turned up in my inbox. It’s a video of our second race, which was memorable because we were winning right up until the point when the boat nearly capsized! Near the end you can hear us scream – the water was pouring in, it was quite scary!

We spent most of the afternoon soaked through to the skin but raring to race! We haven’t had the final total for our team yet but we reckon we raised around £1500 for Help For Heroes and the Yorkshire Air Ambulance.

Right, I’m off to bed. I’ve got to drive to Wales in the morning!

Beccy

Friday, 21 June 2013

Steampunkish pirate part 2

final costume

I thought I’d start with a pic of the costume as it stands now and then follow with a series of ‘how it’s built’ pics. I wanted to avoid cogs and keys - I love it on other people, you know the ones who make an enormous effort and look amazing, but I can’t afford the level of detail involved and I think just chucking a few cogs on stuff can easily look rubbish. Anyway it’s a subtle steampunkery I’m going for but feel free to offer any advice!

bustle

Starting with the petticoat and ruffly shirt (both from charity shops) and the bustle…

skirt side

Then on with the skirt – this is also a charity shop skirt which has large pleated gores. I just tacked sections up at regular intervals to give it that pouffy look. The skirt was too big so I put a large pleat in the back too. This helps to accommodate the bustle but I think it needs a bit of attention or maybe something extra, like a silky red something with tassels draped around?

skirt front

And from the front, ok it needs ironing!

waist front

Then a crazy tight cinch belt. That’s pure elastic folks, with velcro at the back and corset-look pleather at the front. Did I mention it’s tight? I have a 29 inch waist normally but in this thing? More like 25!

belt front

And then an extra added belt – this was really long so I cut out a section, unpicked the stitching, and re-sewed it back together much smaller.

belt sidebustle belt back

A couple of cheeky side and bustle shots – is the bustle too big do you think?

final costumefinal costume back

And last but not least - a corset back waistcoat, my previously mentioned hat, and a little bag for my phone and cash. The waistcoat is from ebay and the bag from a charity shop.

Because I had some of the things in my to-do pile and stash, the whole thing cost me no more that £30.

I also have a pair of stripy plus-fours I found on ebay because, if you remember, I HAVE TO ROW A BOAT IN THIS! Oh dear, I think I might have trouble but do you know what? I’m gonna try! It’s for charity!

Beccy

Tuesday, 26 March 2013

I found time for a refashion…

Since I already had my sewing machine out I thought I’d grab something off the Easy Refashion pile.

3

2

This jumper dress is from Zara kids and was originally intended for a 14 year old! Anyway, it’s 60 % wool and somewhere in its past someone has washed it badly and it has stretched widthways – so much so that it’s too big for me. Well, there is a quick way to fix that!

1

Turn it inside-out and pin, pin, pin! I needed to take in about 2 inches either side to stop it looking like a sack!

IMG_4267

I sewed the new seams, trimmed off the excess and zig-zagged all round to give it a chance at not fraying.

IMG_4320 IMG_4319

All done and looking far more slinky, it honestly isn’t as lumpy as it looks in the photo! I know it’s not the most dramatic or complicated refashion in the world but it’s all I have time for these days, and if it gets one more thing off the pile and into my wardrobe I’m happy!

I’ve got two more weeks until Open Studios and then I can relax for a bit – I got some lovely kidsilk haze for my birthday and the new Rowan pattern book that demand my attention! Also that refashion pile… and a serious amount of WIPs…

Beccy

Friday, 13 April 2012

Garden pond knitting…

I’ve been knitting a lot lately but this is my last speed knit for a while.

I knew I wanted to knit the lovely Garden Pond shawl for my aunt for her birthday last week, but I was so busy with my Alouette that I only left myself a week to do it!

Well, I managed it JUST - I was weaving in the ends on the morning of her birthday!

I used the yarn from a blue/grey 3-ply pure merino jumper that I bought in a charity shop for £3 and unravelled ages ago. Thrifty but quality!

IMG_2589IMG_2590IMG_2591

It was slow going, boring, and took up every evening for the whole week, but worth it I think. It’s very light but warm and will suit those chilly evenings when she goes on holiday.

From now on I’m only going to spend a normal amount of my time knitting!

Beccy

Saturday, 5 November 2011

Bow bag showcase…

I’ve been meaning to share a few of these wonderful bow bags for a while now, but I’m seriously rubbish and disorganised.

Anyway, here they are! Click on the picture or the link below to visit the maker’s blog/flickr (if they have one)

the babe

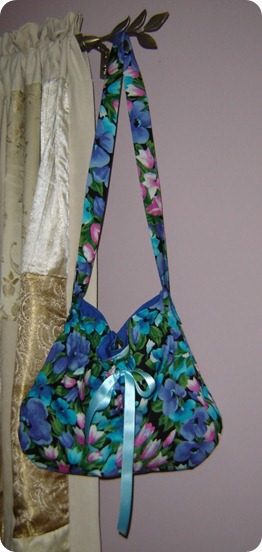
Chic, understated and girly – this bag was made by The Babe.

xperimentl88013_511_001

These two lovely bags were made by Xperimental, check out her mammoth Flickr photoset bags and purses (in fact her entire photostream is pretty awesome!)

The top bag is also on Craftster, which you should definitely check out if you haven’t already.

Purse 1-1Purse 2-1Purse 3-2

These three were made by Amy - I love the contrasting fabric on that last bag!

DSC01810

Mrs P used a remnant to make this great floral version!

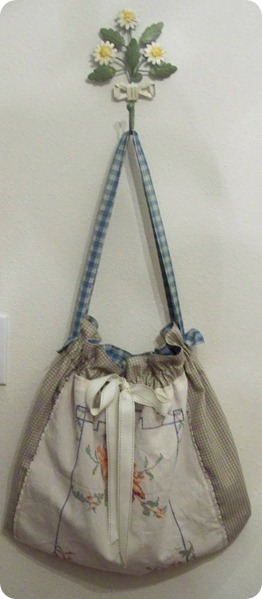
lillycakes

And last but not least, Molly from Lilly Cakes used a vintage table runner and a couple of scraps of gingham to make her version. Beautiful.

Thank you everybody who let me steal their photos for this post. Everybody else, please visit them and give them lots of love!

If you’d like to make your own bow bag the tutorial is available here.

Beccy

Sunday, 16 October 2011

A little embroidery….

can transform a boring skirt into something a bit special.

IMG_0880

Take one 70’s stretchy skirt…

IMG_0881

…add an old embroidery transfer…

IMG_0885

…and play around with stitches you got from an old embroidery book.

IMG_0883

It looks better on me than on the mannequin, but I never take photos of me if I can possibly help it! The stretchy synthetic fabric was the devil to embroider neatly and I should have used some stabilizing fabric to stop it puckering, but overall I think it’s pretty cute.

It is the same skirt as this one, just in a different colour….

…wait a minute! Unless my tagging system is rubbish (and to be honest it is a bit) I haven’t blogged the other skirt.

I just got an idea for another post :)

Beccy

Wednesday, 21 September 2011

Finishing details…

IMG_0867
Remember this? I made it ages ago from one of my grandad’s old shirts. I took it in, reset the sleeves and made a new collar.
IMG_0868
I reused as much as I could, these bits were the cuffs. Faffy, but cute.
IMG_0866
But I didn’t have enough to make any facings. I decided to leave it because I’m lazy, but mum really liked it so I gave it to her. That was ages ago and she hasn’t really worn it because the snipped edges flap up sometimes and look messy.
IMG_0873
Cue 6 months later and 10 minutes with some bias binding…
IMG_0874
…and it looks so neat now. The miracle of bothering to finish things in a tidy way never ceases to amaze me!
Beccy

Sunday, 17 July 2011

Summer top resizing…

I picked up this summery top for 40p at a jumble sale. It’s lovely and crisp cotton with a little bit of stretch and cute pintucks but it was a size 18, and I’m not a size 18.
IMG_0552IMG_0553
First I slit the sides to below the darts – I didn’t just need to take it in, I also needed to make the darts smaller so I opened them up too.
IMG_0555
First I pinned the darts the right amount (check out a shirt that fits you well for a guide) but this left a lot of excess fabric above. I decided to sew this as another dart running flush to the seam of the band around the top. This meant I could hide the excess fabric and make the band run level all around.
IMG_0554
When I was happy sewed the darts up.
IMG_0556
See how the top hem runs flush? I then pinned and sewed the sides, removing about an inch from each.
IMG_0557IMG_0558
It looked fine on the mannequin but on me it gaped a little at the top so I had to put in a little pleat. It’s not the most elegant of solutions and I might have another look at the elastic at the back to see if I could pull it tighter at the top.
IMG_0563IMG_0559
It’ll do as a little summer top though!
Beccy Ridsdel