Showing posts with label furniture. Show all posts

Sunday, 9 September 2012

My new creative space…

Finally finished! From this:

IMG_7391[4]IMG_7393[3]

…to this…

IMG_3201

…to this!

IMG_3440

I’m so pleased. Would you like a quick tour?

You see those drawers in the middle there? Well, they used to house my clothes but they weren’t nearly big enough so I moved my clothes into a huge old chest of drawers and filled these with…

IMG_3443

…yarn! Lots and lots of (too much) yarn. Is it weird that I stashed it by weight? That top little drawer is sock wool, 1ply, 2ply and 3ply. Below that are two drawers of DK, then worsted and aran, then a drawer of chunky.

IMG_3435

My little desk is big enough to sew on and you see those little drawers on the left?

IMG_3438

Well, the bottom six house all my pins and needles, scissors, sewing thread, buttons, embroidery hoops etc. etc.

IMG_3442

And the top four house my knitting stuff.

IMG_3441

Behind the curtain, under the desk, I have more drawers that contain all my sewing patterns (2 big drawers full!). There is also a drawer full of ribbon, trims and bias.

IMG_3439

Above the desk there is a shelf of knitting patterns/books and one full of sewing books. The very top shelf has about forty 1950’s Homes and Gardens magazines. Inspirational stuff!

Well that’s it. It’s been a long, hard slog but it’s now a room I feel happy in - and one I don’t mind other people seeing. It’s organised too and I might actually finish that dress I started more than a few months ago…

Beccy

Friday, 24 August 2012

Still decorating…

Why does always it take so long?

IMG_3374

All the shelves are painted, up and screwed down so I’ve managed to clear a lot of space in the dumping ground workshop by filling the shelves with my books. There are even more than this and I don’t think I’ll fit them but there is always a bit of space on the workshop shelves for things that are currently inspiring us.

IMG_3375

I’ve got a separate space above my sewing corner for all my knitting, crochet and sewing books.

IMG_3373

Most of these drawers are going to house (most of) my yarn – I really need to destash (or knit more things)!

IMG_3376

I’m loving the everything white theme but it’s so clean and uncluttered I’m going to find it hard to bring my stuff back in. I’ve already taken four huge bin bags worth to charity but there may be more.

IMG_3377

I reckon there’s a couple more days work and then I’ll be done with all the painting. I’m having to paint the black floor white in sections – first the space for my bed, then I did the rest leaving a strip from the door to my bed (and a square under the wardrobe), then tomorrow I’ll be starting the rest. It’s taking about five coats including a couple of primer.

Phew!

Nearly done.

Beccy

Thursday, 16 August 2012

My (empty) creative space…

My creative space was most of my bedroom. These photos show just a small part but imagine the whole room looking like this! It was unruly and cluttered and while it looked quite inspiring it was pretty hard to find space to get anything done (or even find anything to do it with). More often than not the sewing machine found its way onto the dining table.

IMG_7391[4]

To be honest I’m a bit of a hoarder really! I needed a dedicated place for everything and to streamline it all.

IMG_7393[3]

It’s hard for me to throw things away, and it took three days to clear the room, but I needed to reclaim my bedroom. Every book, scrap of fabric, ball of wool and Interesting Thing is now bagged up in the workshop. This is my new creative space:

IMG_3202

Lawks! It’s much smaller, cleaner and hopefully it will be tidier. I filled several binbags with rubbish and I have lots still to go through. I still need to finish painting and put everything back but I’ll be judicious! I couldn’t wait to show you the difference but I’ll take more pictures when it’s finished. There will be a whole alcove filled with top to bottom with shelves for books and I have a chest of drawers reserved just for yarn.

I can’t wait for it to be finished! It’s so bright and light. We used Dulux light-reflecting paint for the walls and plain white eggshell for the wood. The floor will also be white but the skirting will be blue. There will be lots of colour though from accessories like the blanket I’m making. I don’t want it to be sterile!

Beccy

Tuesday, 31 July 2012

Painted wood

We love painted wood, much more than stains and varnishes. This wardrobe was my mum’s when she was a kid and it was second-hand then so god knows how old it is.

It had a thick layer of dark brown varnish on it so I decided to strip it off. I forgot to take a before picture of the moulding at the top…

IMG_3008

…but here’s an after picture. Isn’t it lovely? I used paint stripper and a toothbrush to scrub off all that dark varnish, and you really couldn’t tell what was there before.

IMG_3009

I stripped the whole thing and then finished it with fine sandpaper. It looks quite patchy in the pic, but it was much cleaner than it looks.

IMG_3010

Then mum used a small roller and pure white eggshell to finish it. She put the paint on in several thin layers because we didn’t want it to be too white, and also we didn’t want to lose the moulding but accentuate it.

IMG_3031

It’s amazing how a little highlighting has brought out all the detail. Those triangular bits were always just triangles, but now we can see all the little leaves. We never saw the veins in the large leaves before either, or the petals on the flower.

IMG_3032

We love it, and it will be perfect in mum’s newly decorated all-white bedroom (when we finish it!).

Beccy

Wednesday, 7 September 2011

Painting handles with pizza boxes?

Just a quick tip. I needed to spray paint a load of nasty discoloured plastic drawer handles and realised that the easiest way would be to attach them to something stiff and do them all at once. I raided our recycling and found two pizza boxes that were perfect for the job!

IMG_0696

After giving them a good clean I attached them using the screws they came with.

IMG_0699

Then blasted them with a couple of coats of my favourite sky coloured plasti-kote.

IMG_0698IMG_0697

Et voila. Lovely, shiny, bright handles. The round ones were an 80’s red with cream accents. Yummy.

And the result? Well it was always going to be a melamine chest of drawers, there’s no changing that, but it looks a hundred times better than it did and a can of spray paint is a damn sight cheaper than buying something new!

IMG_0727

And anyway, it’s for a boy’s who thinks elegance is a lazboy and some pepsi.

Beccy

Tuesday, 3 May 2011

Refashion a lampshade, a mini tutorial…

Remember this lampshade?

IMG_69882_thumb[1]

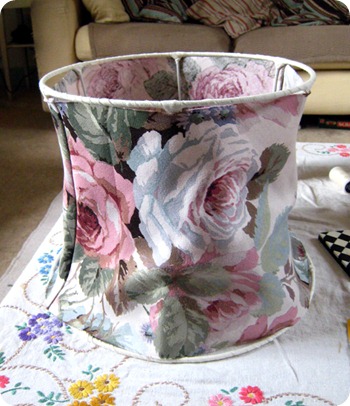
I bought it ages ago for 50p, and although it had a small tear in the back I had to buy it for that fabric. Well that was 2009, and since then one of the metal arms broke and tore the thing in half.
I took the lovely torn fabric off, intending to attach it to some plain fabric to reinforce it, but when I washed it this happened:

IMG_10862

*sob* I was so careful but the fabric was very old and it fell to bits in the water. Only one thing to do – use the fabric as a pattern and make a new one!
IMG_1086

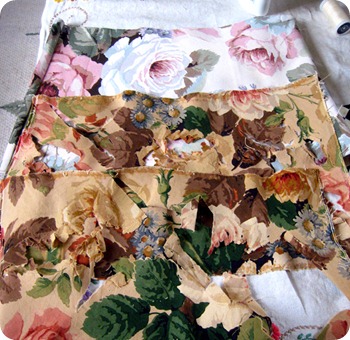
I had a scrap of Sanderson-type upholstery fabric that was just big enough to squeeze the two pieces from.

This is important! Because the lampshade curves in two directions you need to cut the fabric on the bias to make it work. Trust me.

I cut the two pieces and used French seams to sew up the sides but you don’t have to do that, it just makes the inside a bit neater and stronger.

IMG_1079

I then unwrapped all the tape from the top and bottom of the old shade.

IMG_1081

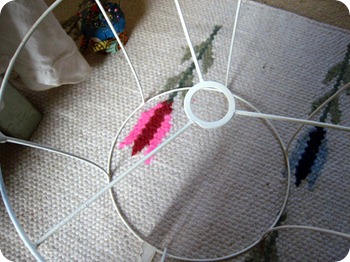
Because one of the arms was broken, I got out my trusty brazing torch and fixed the bejingers out of it. I also reinforced all the other flimsy joints while I was there.
IMG_1083

When the frame had cooled down I gave it a clean and gave it a coat of matt white Plasticote.

IMG_1085

Replacing the tape. You need to wrap the whole top and bottom rail with tape so you have something to attach the fabric to, and you have to wrap it very tightly.
 
IMG_1084

If you need to add another piece, sew it in place to start.

IMG_1087

The wrapping all finished.

IMG_1088

With the fabric in place on the frame before sewing. You can see that it is slightly too wide, but also slightly too short. When you stretch the fabric to fit it to the frame, it will become tight as a drum and fit the curved shape better.

IMG_1090

Fold the fabric over the top slightly and hand sew it to the wound tape, keeping all the stitches on the inside. Make sure the seams are running along the arms of the frame so they don’t show when the light is lit.

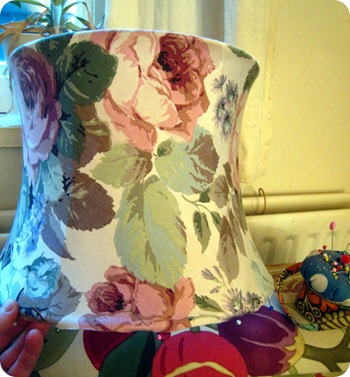
When you’ve sewn all around the top, pull the fabric tight and pin it at the bottom. Start at one arm then pin on the opposite side. Move around the base, pinning as you go, making sure the fabric is pulled tight. When you're done pinning and are happy, sew it the same as the top.
IMG_1091

You can see that by pulling the fabric really tight it fits to the frame. This only works if you cut the fabric on the bias because when you stretch it one way it becomes narrower the other.
Because the wrapped tape is really tight, that fabric ain’t going anywhere!

IMG_1092

The finished lampshade. Lit, you can barely tell the difference between this one and the last one and even though the fabric isn’t quite as nice, I’m pretty pleased with it!

Beccy

Wednesday, 15 September 2010

Decoupage with the stars themselves…

We were given this cabinet when a neighbour moved out. I forgot to take a proper before picture but you can see this cabinet was pretty boring!

IMG_9403

We spray painted the inside with some midnight blue plasticoat…

IMG_9403IMG_9405

…and photocopied a 50’s book called ‘The stars’ by H. A. Ray. It’s a fantastic book full of constellation maps, essentially written for children but it’s fascinating and the illustrations are lovely. Mum’s been busy cutting them up and sticking them all over with wallpaper paste.

IMG_9413IMG_9414Untitled-2

When the whole thing was covered it was finished with a coat of clear varnish to seal it.

Beccy

Wednesday, 2 June 2010

We’ve got taps!

…and benches and worktops. And stuff.

We’ve had a few days off work – Monday was a Bank Holiday so we got that off, but since it’s half term we managed to get a couple of extra days too – so we’ve been putting in some hours trying to get the workshop finished.

IMG_9124

And here’s how it’s looking now. We’ve painted the finished benches and Elle came today to wield her circular saw magic on the worktops. It’s not that I’m scared of it (honest) it’s just that I can’t cut a straight line even with an 8-inch blade, well clamped guides and the will to do it! Elle is a demon with that saw - and she has a sense of urgency even during our current heatwave (which I lack – I just want to sit and drink Robinsons barley water all day).

IMG_9129

This sink drainer was a godsend – it has the perfect shaped hole already cut for a Belfast sink and it’s (probably) teak. It cost us £6 on ebay plus the drive to Hull pick it up. It looks lovely now but it was a bit grotty when we got it (which wasn’t mentioned in the listing), but for £6? We knew we could clean it. A bit of elbow grease and a gallon of teak oil later (did you guys know that stuff can spontaneously combust? Yikes!) and it is now shiny and looking as good as new. The taps are chrome, 40’s and cost considerably more!

IMG_9130

Our Belfast sink was also an ebay find and cost £5 plus the drive to a Mormon church in Rotherham to pick it up – Elle has a very handy other half who’s going to come and drill us a huge hole through the wall for the sink waste, then we can fit it in and we’re good to go!

IMG_9127 IMG_9126

I also hung a curtain today because I’m paranoid of night-time peepery. Ok, I’m not going to be getting changed in there or anything but a lit room with black uncovered windows always makes me feel like I’m being watched. This is one half of a pair of curtains we bought from Oxfam a few months ago, the other one is going to become a blind for the window.

IMG_9125

And finally, we just managed to stop this going into a skip at college. It was dirty and worn and that orangey woody colour. There are also 20 trays in a lovely shade of school furniture brown. So, we painted the carcase in the same shade of white as the walls and the trays are getting a coat of pale blue Plastikote. It has doors that refuse to hang straight so I think we’re just going to leave them off. This will be great for holding all our tools and Interesting Things.

Right, I’m off – Junior Apprentice is on telly and I need to nurse my slight sunburn.

Beccy